Data recovery from a Buffalo NAS using a PC
The conventional way of recovering lost data from a NAS device is turning it off, removing the disks and connecting them to a PC for running them through data recovery software. In most cases this is the safest and most reliable way of data recovery which has many advantages:
- A vast variety of data recovery software is available for performing data recovery;
- Using a powerful computer for data recovery makes the data recovery process much faster;
- There are many options of saving the recovered data: all the connectivity capabilities of the host computer may be used.
However, there are also certain difficulties:
- Connecting 6 disks to a PC will require multi-port or multiple USB adaptors or using internal connectors of the PC. Moreover, connecting 6 disks may require even installing of special expansion boards and using of more powerful power source;
- Conventional hard disks (unlike SSDs) require very careful handling;
- Static electricity in the process of handling may cause electronics damage;
- At least basic technical skills are required to operate computer hardware.
In order to keep your data safe, if you are not sure in your skills, it is advised to turn the NAS off and contact your local data recovery service provider company.
Please also note that this Buffalo NAS may be compatible with the "Network Storage Recovery for Buffalo NAS" software and there also may be the possibility data recovery over a network.
Step 1. Connecting disks from a NAS to a PC.
To recover data from a NAS, it must be turned off, disks from it must be ejected and connected directly to a PC to grant data recovery software direct low-level access to the storage. Usually disks can be easily ejected because the possibility of replacement of a failed disk is assumed for this kind of NAS. Refer to the user manual of your NAS to find more information about the disk removal procedure.
After removal, the disks have to be connected to the host ("recovery") PC:
- At least part of disks can be connected using USB-to-SATA adaptors. It is advised to use USB 3.0 double-SATA models, however any available adaptor can be used. Note: older adaptors may work incorrectly with disks that have the capacity over 2TB;
- Using expansion rack box(es);
- Depending on the motherboard connecting capabilities of the PC, some disks can be connected to SATA ports on computer's mainboard and powered from the internal power supply;
- Some or even all disks can be replaced with bit-to-bit "disk image" files, saved elsewhere to a disk of larger capacity or to another network attached storage.
Important notice 1: In case the file system on the NAS was not damaged and the reason for data loss is NAS hardware failure (other than hard disk failure), it may make sense to connect the NAS storage to a PC with the Linux operating system (or boot a Windows PC or Mac using Linux Live CD). Linux OS may support the file system on the disks and may let you copy the data without using of any third-party software.
Important notice 2: If the file system on the NAS is damaged or you are recovering deleted files, it's recommended to use a PC with Windows OS and not Linux. The reason for this is that Windows will not support the file system used on the NAS and thus will not implicitly write any data to the storage, causing irreversible data loss.
Step 2. Choosing and starting data recovery software.
NAS devices with multiple disks are usually configured by default to RAID5 or RAID6. Other configurations (such as RAID0, RAID10, RAID51 etc.) are also possible so it is required to use data recovery software with "RAID support" function.
We recommend using of Recovery Explorer RAID, however the following options can be also considered:
- Recovery Explorer Professional - professional software that fits better to experts and technical specialists;
- UFS Explorer RAID Recovery - older software version that also fits well to this data recovery purpose.
The recommended software will not modify any data on the disk during recovery so the attempts can be repeated using different software and with different settings as many times as needed. If you don't have a license for this software yet it's recommended to try out a trial copy before purchasing the license. In case of successful evaluation, the software can be activated on-the-fly to allow you to copy the recovered data immediately.
To begin, download, install and run the chosen software by following the links provided above.
Step 3. Revising the current state of things.
Start the software and make sure all the connected drives are properly displayed in its left panel properly. If not, check if:
- The power supply is connected properly to the disk (3.5" drives require dedicated power from the internal power supply or from special external power source);
- Check if the SATA cable is connected firmly. If it is not, it may make sense to try replacing the cable;
- If you are using USB adaptor, make sure it is powered properly. Also, in this case follow the right drive startup procedure: first, power on the drive and second - connect the USB cable to your PC.
If nothing helps, it's advised to consider contacting a local data recovery services provider company.
At this stage, you also should open all the disk image files that you used to replace the original disks. For this click the "Open" button in the main menu, select "Image file or virtual disk" and then browse for the disk image file to open it. On success, new a storage will appear in the software, like this:
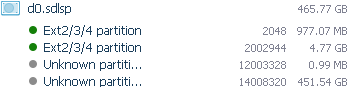
And any real disk from the NAS will be displayed in the software like this:

The actual number of partitions, their identification and the reported state will depend on the NAS model, firmware version, software installed to the NAS, storage capacity and other factors.
To revise the current state of storage: scroll down the list of available storages and find the largest "RAID" volume. It should look like this:
Make sure it has a partition on it with green indication. Double-click this parition to open it in Explorer and to revise the current state of the data.
It is possible that a multi-disk NAS is configured to a non-RAID or "Mirror" setup. In this case it's advised to revise the content of the largest (the "data") partition of each disk to check if the data can be found there.
Step 4. If RAID failed.
If this NAS uses a RAID (such as RAID0 ("Stripe"), "Span", RAID5, RAID6, RAID10 etc.) it should be "virtually assembled" by the software before running any data recovery operations. If the RAID is not in list of opened storages, probably the RAID metadata is damaged and manual RAID reconstruction is required.
To do this, click the "Build RAID" button in the menu Identify the components and configuration of the RAID and add RAID components to the RAID one by one. For this right-click the "data" partition of the disk in the left panel and choose the "Add to RAID" option. Use the toolbar of RAID builder to adjust the order or remove the components.
Usually the "data" partition has the same non-zero offset and the same size on each disk. Use this to control that the components are added properly. Adjust the RAID parameters, such as the RAID level and stripe size and press the "Build" button in the RAID builder dialog.
If everything is alright, the new "RAID" storage will be added to the list of available storages, like this:
Make sure that it has a partition on it with green indication. Double-click this partition to open it in Explorer and to revise the current state of the data. If the data looks damaged, this may indicate wrong RAID parameters. In this case right-click the RAID and choose "Edit RAID configuration" to open it again in the "RAID Builder" dialog. Adjust the RAID configuration and try again.
Even if the RAID is assembled correctly, there are some reasons for damaged data:
- Data or the file system metadata on the disks was damaged. In this case running data recovery scan may solve or partially solve this issue;
- One of the RAID components was disconnected from the RAID some time ago and thus it contains outdated information. In this case, removing this component and replacing it with a "placeholder" (for automated data reconstruction using RAID redundancy information) may help to solve this issue.
Important: the software does not write any RAID information back to the source disks, so you may repeat as many RAID reconstructions attempts as required without risking to the original data.
Step 5. Recovering data.
The software allows you to revise fast the content of the file system volume using the "Explorer" mode. Using "Explorer" you can find your shared folder and check if the data you are looking for is available there.
If the data is not there, use the "Scan..." tool from the Explorer's main menu to start the scan for lost and deleted data. Usually, you may start the scan just with the default parameters offered by the software. After the scan, it's advised to revise the data again to check if the files you are looking for are found. You should check the content of the original folder and the $LostFiles virtual folder. If the data is still not there, revise the content of the entire file system (try using the "Find file" function) and check for files inside of "found by type" content (files found using IntelliRAW).
If the data still cannot be found, it may make sense to contact a local data recovery service provider company.
When the data is found: select files and folders to be recovered and use "Save..." tool from the context or main menu to start data copying. You may use an internal or external hard disk as well as another network attached storage as a target location for saving files.
In the trial mode, the software allows saving files with the size below 768KB. Copying larger files will require software license activation.
When the last file is copied, you may return the disks back to the NAS and boot it again. If the reason for data loss was the file system damage or the loss of RAID configuration loss, you may reset the NAS back to the factory defaults and copy the data to it again.
 |
Download the Recovery Explorer RAID application. |
|
Download the Recovery Explorer Professional application. |